Mystery knitting in the spirit of Hildur
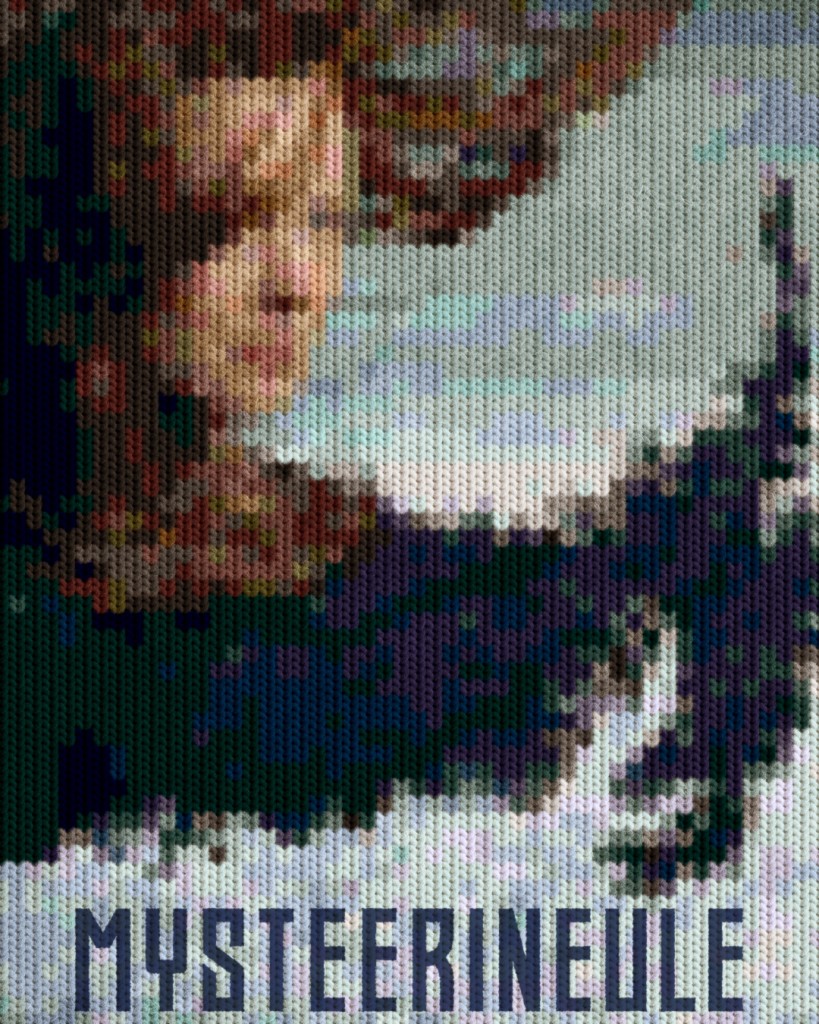
What could be better suited to a gloomy winter than mysteries and knitting? In the spirit of Hildur, we challenge you to combine the two by participating in HKT’s mystery knitting.
Oh, what on earth is mystery knitting? Mystery Knit-A-Long = MKAL = joint knitting, where the pattern is revealed in parts and the end result remains a surprise. A bit like the endings of detective stories.
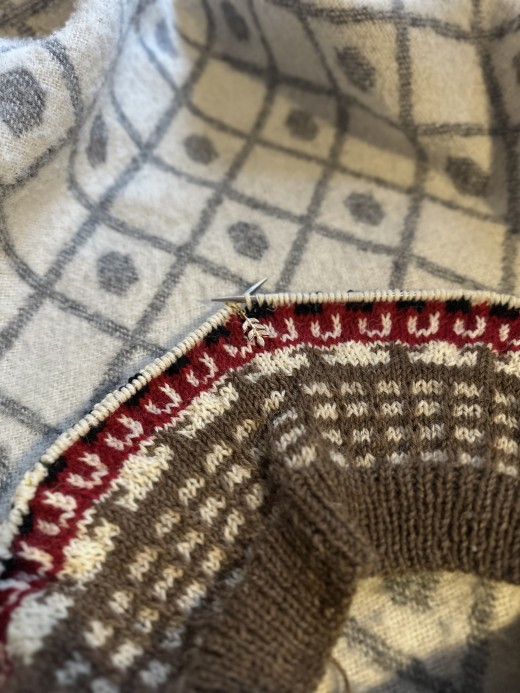
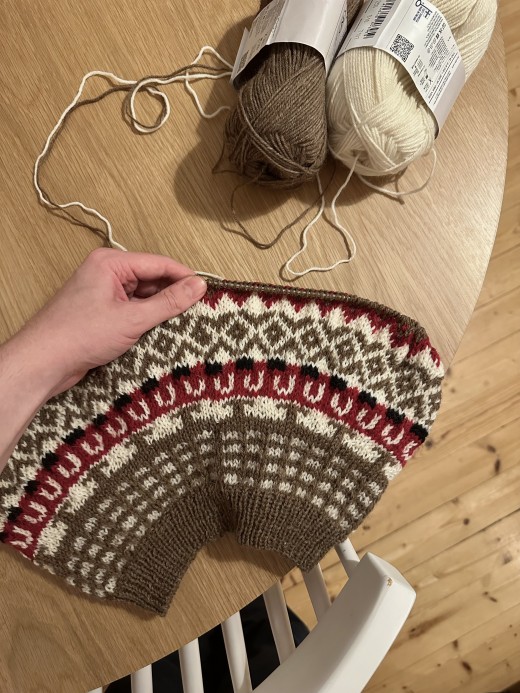
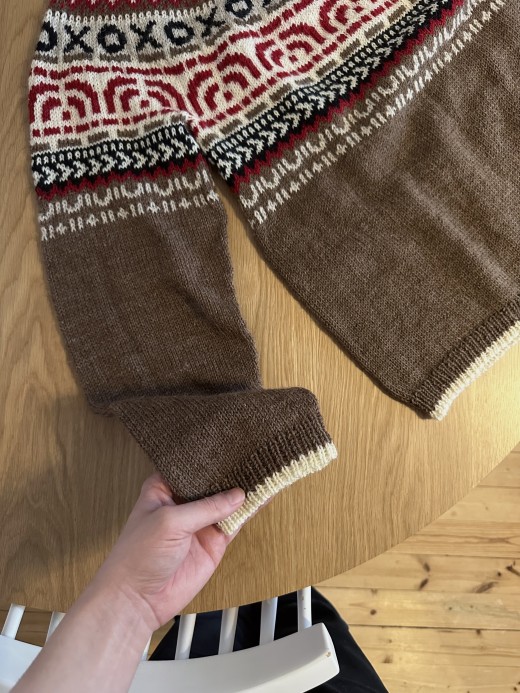
Helsinki-based knitwear designer Joona Höri has created HKT’s own Icelandic-inspired curved knit called Foyer. So the sweater in the picture is not related to the case, but the end result of the mystery sweater is a warm and classically beautiful curved knit. We reveal the knitting pattern piece by piece every week until the premiere of Hildur. The first part of the instructions will be published on Friday 5.12.
You can use the recommended colors chosen by Joona in the mystery sweater or design a combination that you like. You will need five different coloured yarns: a dark main colour, two light-coloured contrast yarns, one bright and distinctive contrasting colour, and one dark contrasting colour. Joona’s recommended colors are listed below.
Foyer sweater
SIZES
1 (2, 3, 4, 5) (6, 7, 8, 9)
XS (S, M, L, XL) (2XL, 3XL, 4XL, 5XL)
Pattern knit in size 4 (L)
Note! The dimensions are calculated. The finished knit may stretch when wetted/steamed.
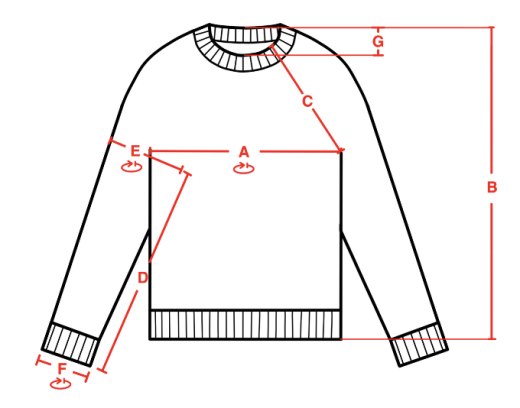
(A) Knit chest: 89.5 (96, 105.5, 115, 125) (134.5, 144, 157, 166.5) cm
The knit contains 14–17 cm of positive looseness
(B) Length middle back: 62 (63, 64, 65, 66) (67, 68,69, 70) cm
Length Variable¢
(C) Armway Height: 24 (24, 24, 24, 24) (27, 27, 27, 27) cm
(D) Sleeve length: 46 (46, 46, 48, 48) (48, 50, 50, 50) cm
Length Variable
(E) Upper Hand Circumference: 38.5 (38.5, 38.5, 38.5, 41.5) (41.5, 41.5, 41.5, 45) cm
(F) Sleeve circumference: 25 (25, 25.5, 26.5, 26.5) (27, 28, 28, 29) cm
(G) Neckline depth: 5.5 cm
YARN
Yarn Strength: Sport
Pattern knit yarn: Novita Nalle (80% wool, 20% polyamide),
280 m / 100 g
Main colour: (068) wild mushroom
Contrast colour 1: (010) off-white
Contrast colour 2: (061) linen
Contrast colour 3: (523) lingonberry
Contrast colour 4: (099) black
SALES
PV (brown): 5 (5, 5, 6, 6) (6, 7, 7, 7) gathers of recommended yarn, or 1080 (1140, 1230, 1340, 1460) (1460, 1570, 1680, 1810) meters of sport strength yarn
KV1 (white): 2 (2, 2, 2, 2) (2, 2, 2, 2) of recommended yarn, or 280 (290, 310, 320, 340) (340, 360, 370, 390) meters of sport yarn
KV2 (linen): 1 (1, 1, 1, 1) (1, 1, 1, 1) skein of recommended yarn, or 100 (110, 110, 120, 130) (130, 140, 140, 150) meters of sport yarn
KV3 (red): 1 (1, 1, 1, 1) (1, 1, 1, 1) skein of recommended yarn, or 130 (130, 140, 150, 150) (160, 170, 180, 180) meters of sport yarn
KV4 (black): 1 (1, 1, 1, 1) (1, 1, 1, 1) skein of recommended yarn, or 90 (100, 100, 100, 110) (110, 120, 120, 130) meters of sport yarn
KNITTING TENSION
25 sts / 32 rows (10 x 10 cm) of coloured stitch as a closed knit after finishing
NEEDLES
– 3.5 mm circular needles (ø 40 cm) for elastic neckline and sleeves and (ø 80 and 120 cm) for curve and torso
Note! Use needles of the size that you reach the required knitting tension.
OTHER ACCESSORIES
Parsiiniula
Loop markers
loop cable or leftover wire
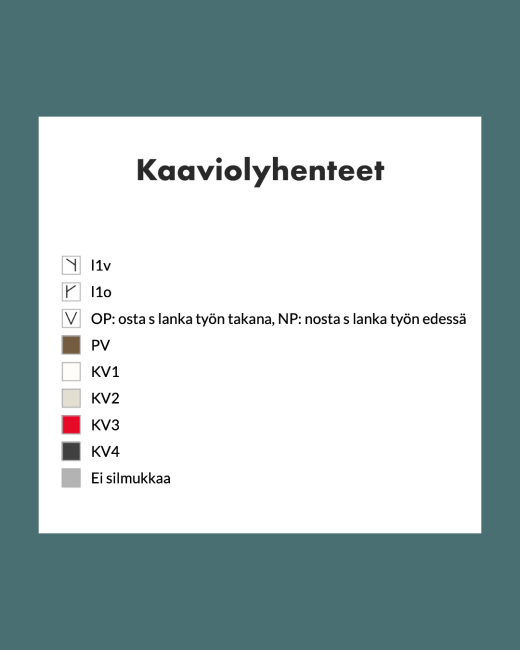
ABBREVIATIONS
2 stitches total = knit 2 stitches together
am = set loop mark
KNK = reduction of two lifts
floor = floor
ks = double loop
KV = contrasting colour
l1o = add 1 right-turn increment
l1v = add 1 left-turning increment
n = purl (purl stitch)
NP = reverse side
o = right (right stitch)
OP = right side
pm = remove loop marker
PV = primary color
s = loop
sm = move loop marker
FAQ
The shirt is knitted from top to bottom, starting with the elastic of the neckline. After the ribbing, shortened layers are made to improve the fit. The work continues with the coloured knitting section of the curve, which is repeated until the sleeve loops are separated. After separating the stitches, the body is first continued with a coloured knitting pattern, after which the rest of the body is knitted normally in one colour. The sleeves are also knitted with the same coloured knitting section as on the body, after which sleeve reductions are made. A small accent stripe is made on both the hem and sleeve ribbing in a contrasting color.
NECKLINE
Tip! If you create the s’s with another technique, you can directly use 3.5 mm needles.
Cast on 120 (124, 132, 134, 140) (144, 150, 152, 156) sts with a 3 mm circular needle and PV using the Italian starting technique. Combine into a closed knit. To the starting point of the Am floor. Switch to 3.5mm needles.
Knit 1 stitch, 1 st rib for a total of 4 cm.
Continue with PV and evenly add 16 (20, 20, 26, 28) (32, 34, 40, 44) as follows:
Sizes 1, 3 and 6-9:
*l1o, 7 (-, 6, -, -) (4, 4, 3, 3) o, l1o, 8 (-, 7, -, -) (5, 5, 4, 4) o *. Repeat the interval *–* a total of 8 (-, 10, -, -) (16, 16, 20, 22) times. Knit at the beginning of the row in sizes 3 and 8–9.
Continue in size 7:
l1o, – (-, -, -, -) (-, 4, -, -) o, l1o, knit to the beginning of row.
Sizes 2 and 4-5:
*l1o, – (6, -, 5, 5) o*. Repeat the interval *–* a total of – (20, -, 26, 28) times. Knit at the beginning of the row in sizes 2 and 4.
There are now 136 (144, 152, 160, 168) (176, 184, 192, 200) p.
Continue with KV2 and start knitting the shortened rows as follows:
Note! The shortened rows are knitted using the mosaic technique.
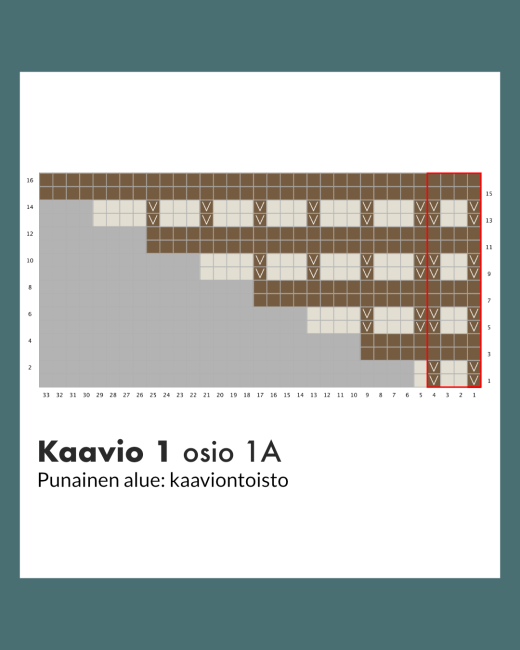
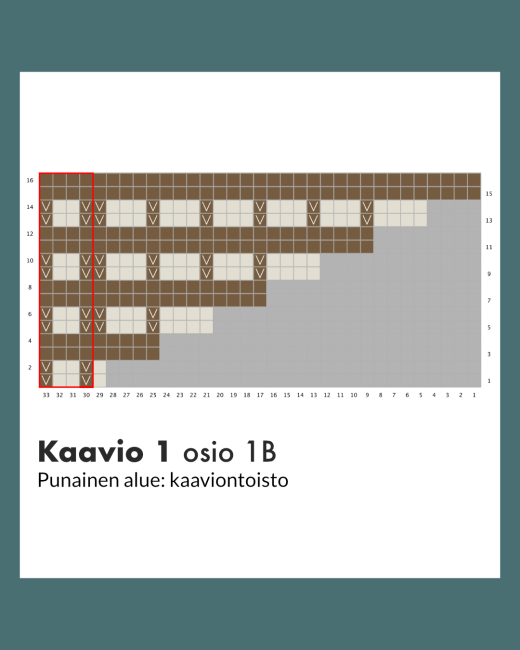
Note! When knitting a row of NP, when moving from section 1A to section 1B, always repeat the row lower than the row. That is, on row 2, repeat in section 1A row 2, and in section 1B row 1, etc.
Row 1 (OP): repeat the diagram repetition of diagram 1A a total of 6 (7, 8, 9, 10) (11, 12, 13, 14) times, am, repeat to the end of the diagram row.
Row 2 (NP): repeat diagram 1A for marker, s.l., repeat diagram 1A for the marker at the beginning of the row, sm, repeat diagram 1B for a total of 6 (7, 8, 9, 10) (11, 12, 13, 14) times, am, repeat row of diagram to the end.
Row 3 (OP): repeat diagram 1B to the marker, sm, repeat diagram 1B to the marker of the beginning of the row, sm, change to PV, repeat diagram 1A to the marker, sm, repeat to the end of the diagram row.
Row 4 (NP): repeat diagram 1A to the marker, s.l., repeat diagram 1A to the marker at the beginning of the row, sl one, repeat diagram 1B to the marker, sl one, repeat to the end of the diagram row.
Row 5 (OP): repeat diagram 1B to the marker, tr, repeat diagram 1B to the marker of the beginning of the row, tr, change to CH2, repeat diagram 1A to the marker, tr, repeat to the end of the diagram row.
Row 6 (NP): repeat diagram 1A to the marker, sn, repeat diagram 1A to the marker of the beginning of the row, sm, repeat diagram 1B to the marker, tr, repeat to the end of the diagram row.
Repeat rows 3–6 a total of 3 times. Repeat the rows 3–4 times. Repeat row 5 at the beginning of the row. You can remove all but the characters at the beginning of the row.
DIAGRAMS
Foyer Mystery Sweater Part 2
Start knitting the coloured knitting curve as follows:
Repeat the 8-sec chart repeat a total of 17 (18, 19, 20, 21) (22, 23, 24, 25) times. Knit rows in the diagram 1–15 times. Make increases on rows 4, 7, 12 and 15 according to the diagram.
There are now 272 (288, 304, 320, 336) (352, 368, 384, 400) pages in the work.
Foyer Mystery Sweater Part 3
Continue the knitting curve as follows:
Repeat the 16-sec chart repeat a total of 17 (18, 19, 20, 21) (22, 23, 24, 25) times. Knit rows 1–16 of the diagram once. Make the additions on row 10 according to the diagram.
There are now 306 (324, 342, 360, 378) (396, 414, 432, 450) s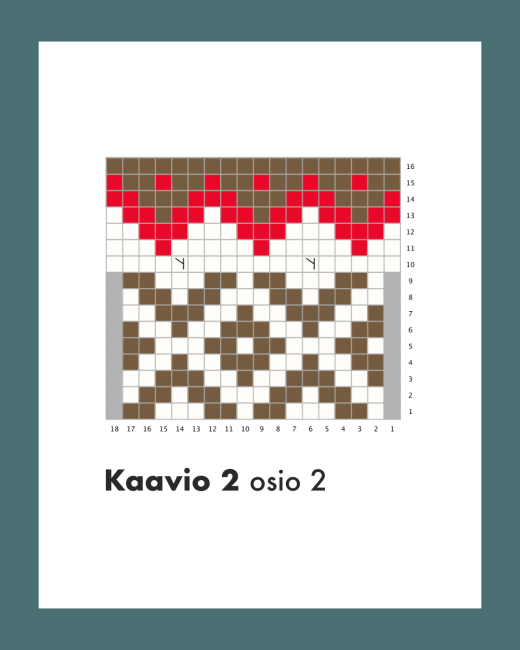
Foyer Mystery Knit Part 4
Continue the knitting curve as follows:
Repeat the 18 sec chart repeat a total of 17 (18, 19, 20, 21) (22, 23, 24, 25) times. Knit rows 1–17 of the diagram once. Make increases on rows 4 and 14 according to the diagram.
There are now 374 (396, 418, 440, 462) (484, 506, 528, 550) sec.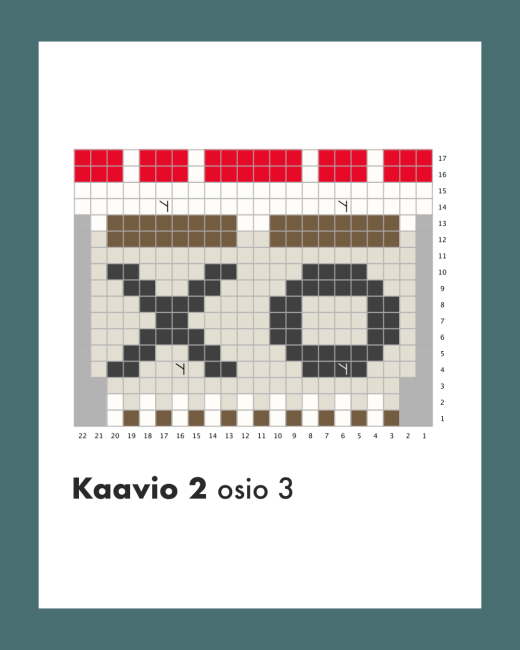
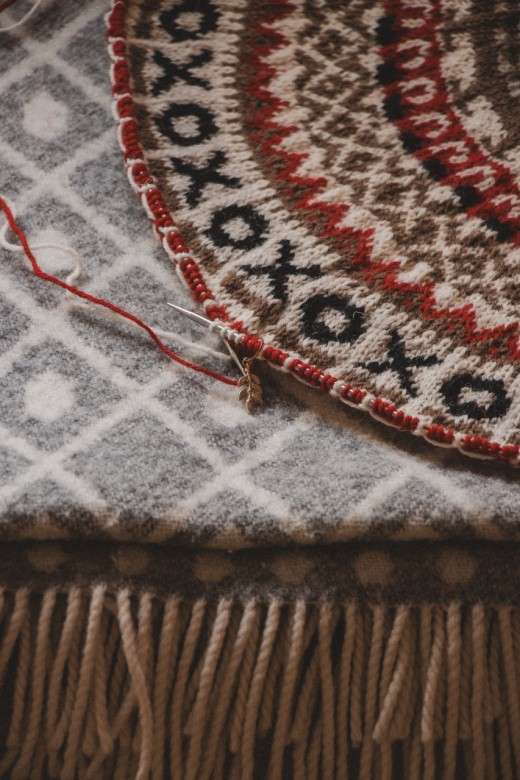
Foyer Mystery Knit Part 5
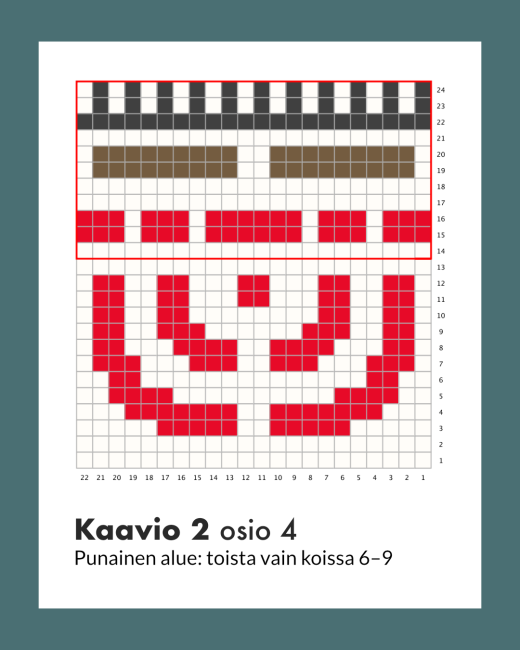
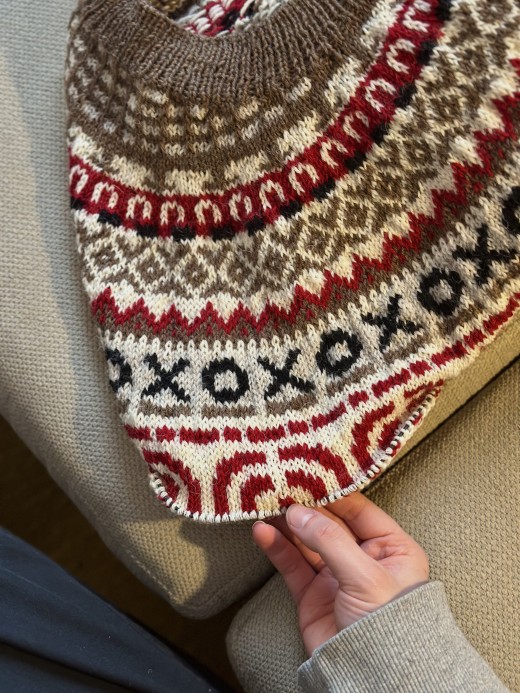
Continue the knitting curve as follows:
Repeat the 22 sec. chart repeat a total of 17 (18, 19, 20, 21) (22, 23, 24, 25) times. Repeat rows 1–13 in sizes 1–5 and rows 1–24 in sizes 6–9 once.
Foyer Mystery Knit Part 6
Separation of the body and sleeve loops
Note!Continue separating the torso and sleeves on KV1 in sizes 1–5 and on KV4 in sizes 6–9.
Separate the stitches on the torso and sleeves as follows:
49 (55, 60, 66, 71) (77, 82, 88, 93) sts, transfer the next 88 sts [left sleeve] to stitch cable or leftover yarn, cast on 13 (10, 11, 12, 13) (14, 15, 20, 21) sts, 99 (110, 121, 132, 143) (154, 165, 176, 187) sts, transfer the next 88 sts [right sleeve] to stitch cable or leftover yarn, cast on 13 (10, 11, 12, 13) (14, 15, 20, 21), knit to mark the beginning of the row.
There are now 224 (240, 264, 288, 312) (336, 360, 392, 416) p.
Body
Continue the body as follows:
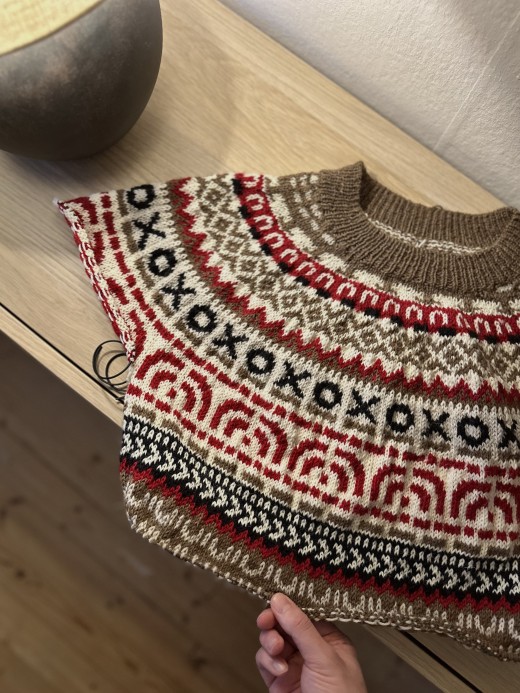
Start the diagram from row 1 in sizes 1–5 and row 12 in sizes 6–9. Repeat the 8-sec chart repeat a total of 28 (30, 33, 36, 39) (42, 45, 49, 52) times. Knit the diagram once.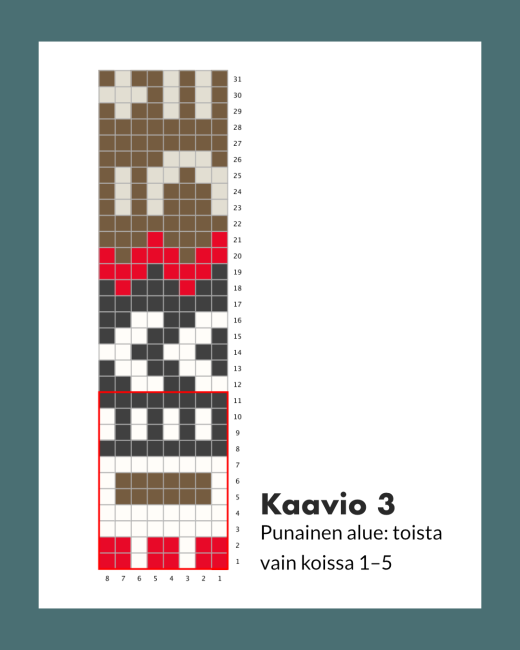
Foyer Mystery Knit Part 7
Continue the body as follows:
Note! Change the needle size to a smaller one if necessary to keep the knitting tension the same.
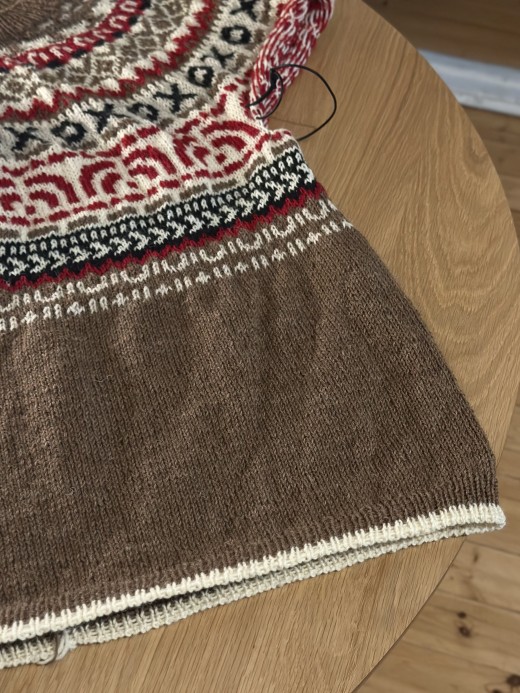
Continue the body with PV until the knit measures 59 (60, 61, 62, 63) (64, 65, 66, 67) cm measured in the middle of the back, or 3 cm less than the desired length.
Start knitting the ribbing of the hem as follows:
Knit 1 st, 1 st rib for a total of 2 cm. Switch to KV1 and extend the 1 o, 1 n elastic for another 1 cm. Inference the loops using the Italian inference technique.
Foyer Mystery Knit Part 8
Sleeve
Note! Start knitting the sleeve on KV1 in sizes 1–5 and on KV4 in sizes 6–9
Place the sleeve sts back on the needle. Starting in the middle of the armpit creation edge, pick up and knit o evenly 4 (4, 4, 4, 8) (8, 8, 8, 12) sts, 88 o, pick up and knit o 4 (4, 4, 4, 8) (8, 8, 8, 12) sts. To the starting point of the Am floor.
There are now 96 (96, 96, 96, 104) (104, 104, 104, 112) p.
To start knitting the sleeve, follow these steps:
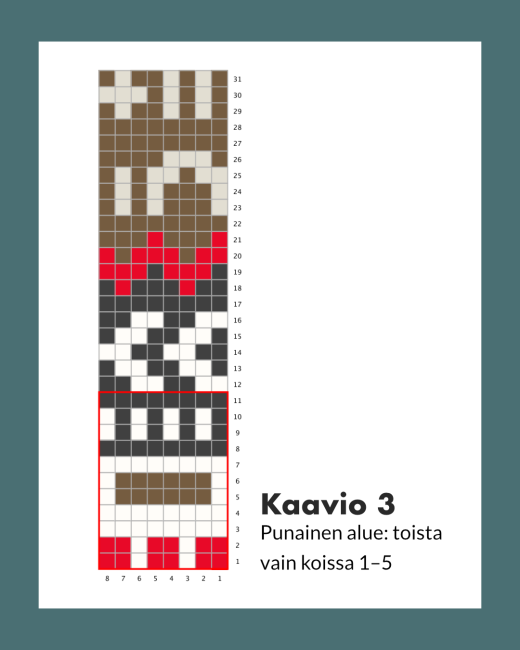
Start the diagram from row 1 in sizes 1–5 and row 12 in sizes 6–9. Repeat the 8-sec chart repeat a total of 12 (12, 12, 12, 13) (13, 13, 13, 14) times. Repeat the diagram once.
Note! Change the needle size to a smaller one if necessary to keep the knitting tension the same.
Continue knitting the sleeve as follows:
Note! Extend the sleeve with PV.
Row 1: knit all st.
Repeat row 1 a total of 4 (4, 8, 8, 10) 10, 10, 10, 10) times.
To start the sleeve reductions, follow these steps:
Decrease row: 2 knit in total, knit until there are 2 sts left before the marker at the beginning of the row, knit st. 2 sts narrowed.
Repeat the decrease row every 6th (6th, 6th, 7th, 5th) (6., 7., 7., 6.) A total of 16 (16, 15, 14, 18) (17, 16, 16, 19) rounds.
Repeat the narrowing row one more time. There are now 62 stitches (62, 64, 66, 66) (68, 70, 70, 72).
Then continue knitting the sleeve until it measures 43 (43, 43, 45, 45) (45, 47, 47, 47) cm from the armpit creation edge, or 3 cm less than the desired length.
Start knitting the sleeve ribbing as follows:
Knit 1 st, 1 st rib for a total of 2 cm. Switch to KV1 and extend the 1 o, 1 n elastic for another 1 cm. Inference the loops using the Italian inference technique.
Knit the other sleeve in the same way.
Finishing
Conclude all the thread ends. Check the dimensions of the sweater and wet or steam the sweater if necessary.
Read the entire instructions in PDF format here.